Deploying TCE with NSX Advanced Load Balancer (AVI) on VMware Cloud on AWS
On my last blogpost I went through the process of automating the deployment of Tanzu Community Edition clusters on VMware Cloud on AWS, but it did not include any load balancer integration. If you were following that script, you can execute these steps after phase 3. Even though this is a process that I am currently looking into fully automating with AVI’s terraform provider and some additional powershell scripts, I also wanted to go through the some of the manual steps.
Preliminary steps
Network Configuration
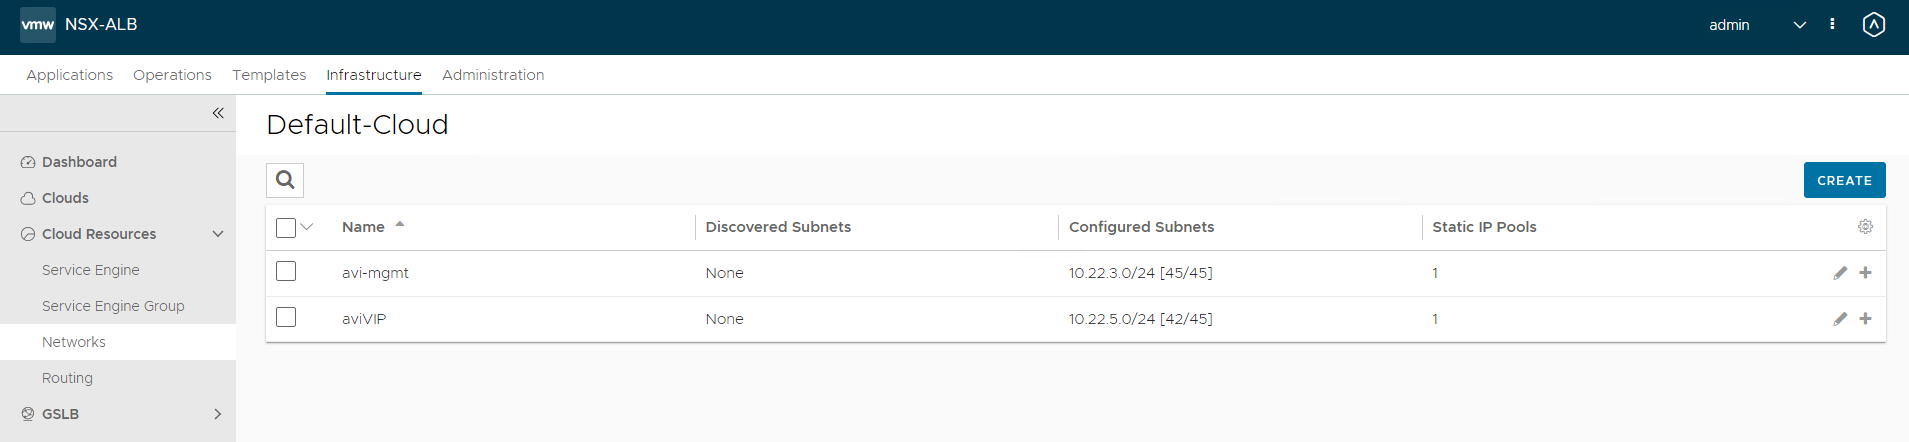
In my previous blogpost only one network was created, which was used by the TCE clusters. For deploying a load-balanced TCE cluster, and on addition to this network segment, two more are created: “aviMGMT” and “aviVIP”. The aviMGMT network is the one which will be used by the AVI controller and the service engines. The aviVIP network will be used by the AVI controller to allocate the load balanced virtual IP addresses that will ultimately point to the workloads.
The reference network configuration can also be found in my previous blogpost. On addition to the firewall rules created there, three-way communication between the TCE cluster network, aviMGMT and aviVIP through HTTP/HTTPS must be enabled. Additionally, the AVI Controller network (aviMGMT) must be able to send HTTP/HTTPS requests to the vCenter so as to create virtual IPs and allocate them in the aviVIP network.
Terraform Provider
As I mentioned at the beginning, I have also started automating some of these steps by using the AVI terraform provider. I think this provider is quite complete, but unfortunately the documentation does not show a clear structure of some of the nested parameters, so I had to investigate a little and view it directly in the AVI REST API. In order to use this provider, we will first have to configure it:
provider "avi" {
  avi_username   = "admin"
  avi_tenant     = "admin"
  avi_password   = "mypassword123"
  avi_controller = "10.22.3.5"
  avi_version    = "21.1.1"
}
Aditionally I created a couple locals so as to not have to write the same parameter more than once:
locals {
  cloud_name           = "Default-Cloud"
  service_engine_group = "Default-Group"
  tenant_ref           = "/api/tenant/?name=admin"
  vip_network_name     = "aviVIP"
  vip_network_cidr     = "10.22.5.0/24"
}
AVI Controller
The AVI controller is a centralized brain for all load balancing operations. It has visibility across the environments and (in an on-premises environment) automates the deployment and management of the load balancing endpoints, which are known as Service Engines. Unfortunately, in VMware Cloud on AWS the AVI Controller does not automate the configuration and management of Service Engines due to a lack of permissions on the cloudadmin@vmc.local user. But that does not mean we cannot use an NSX Advanced Load Balancer in our VMWonAWS infrastructure.
Deployment and first steps
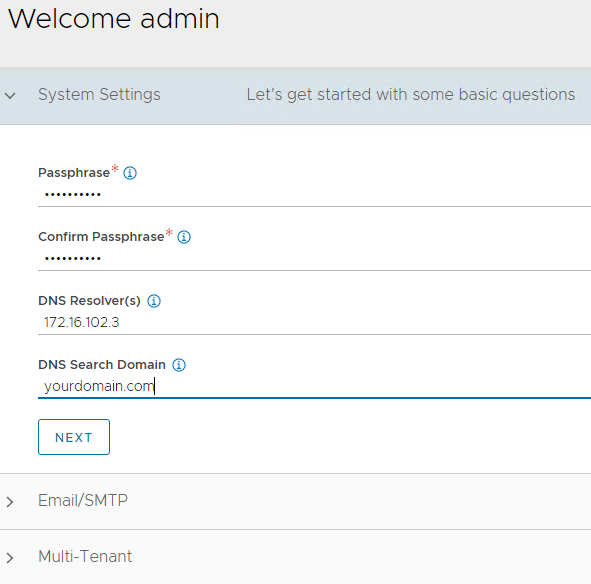
Download the AVI controller OVA file from customer connect. When deploying the AVI Controller into vSphere you will need to set up some parameters, such as its static IP address, default gateway, and subnet mask. Some other parameters will automatically be filled in by the NSX Manager. Select a static IP address from your “avi-mgmt” network outside of DHCP range and assign it to the AVI controller. Refer to phase 3 in the github repo if you also want to automate the OVA upload.
- Admin username
- Admin password
- Passphrase (for restoring your AVI controller/cluster)
- DNS resolver + search domain
- Localhost email
Controller configuration
Since the cloudadmin@vmc.local user does not have all required permissions to read/write to vCenter API, we will configure our infrastructure in a “No Orchestrator” mode. This means that we will have to manually create some of the objects that would automatically be created on an on-premises infrastructure, where the vSphere orchestrator can be used.
One of the negative points of AVI on VMC is the fact that the access mode on the configured cloud is only Read, and not Write, which would be needed to allow the AVI controller to deploy service engines into vSphere by itself. This would make me think by default that all the existing networks and routes will be imported automatically, but it is sadly not the case.
Define networks
resource "avi_network" "avi-vip" {
  name = local.vip_network_name
  tenant_ref = local.tenant_ref
  configured_subnets {
    prefix {
      mask = 24
      ip_addr {
        addr = cidrhost(local.vip_network_cidr,0)
        type = "V4"
      }
    }
    static_ip_ranges  {
      range  {
        begin {
          addr = cidrhost(local.vip_network_cidr,5)
          type = "V4"
        }
        end {
          addr = cidrhost(local.vip_network_cidr,49)
          type = "V4"
        }
      }
      type = "STATIC_IPS_FOR_VIP"
    }
  }
}
When defining the VIP network, we also assign it a static IP pool range, which will be used by the AVI controller to assign virtual IPs to the services we want to load balance.
Configure default gateway (static routes)
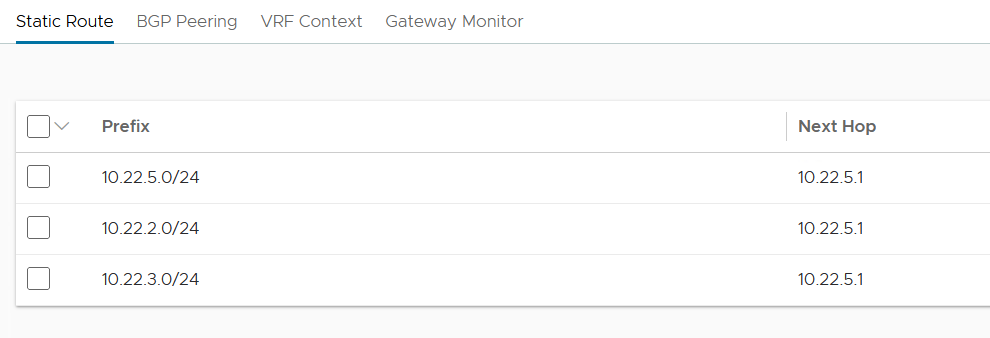
By defining the routes in the AVI controller, we are instructing the service engines to use the gateway on the VIP network (10.22.5.1) in order to reach the three known networks (workloads, aviMGT and aviVIP).
Create an IPAM profile
The IPAM, or IP address management, is a way for the AVI controller to allocate IP addresses from a pool of IPs within the subnet configured. In our case, we will create an IPAM profile named Tanzu, in which we will assign it a usable network (aviVIP) to our infrastructure (Default-Cloud), as shown below:
resource "avi_ipamdnsproviderprofile" "ipam-provider" {
  name = "Tanzu"
  type = "IPAMDNS_TYPE_INTERNAL"
  tenant_ref = local.tenant_ref
  internal_profile {
    usable_networks  {
      nw_ref = local.vip_network_name
    }
  }
}
Edit Default-Cloud
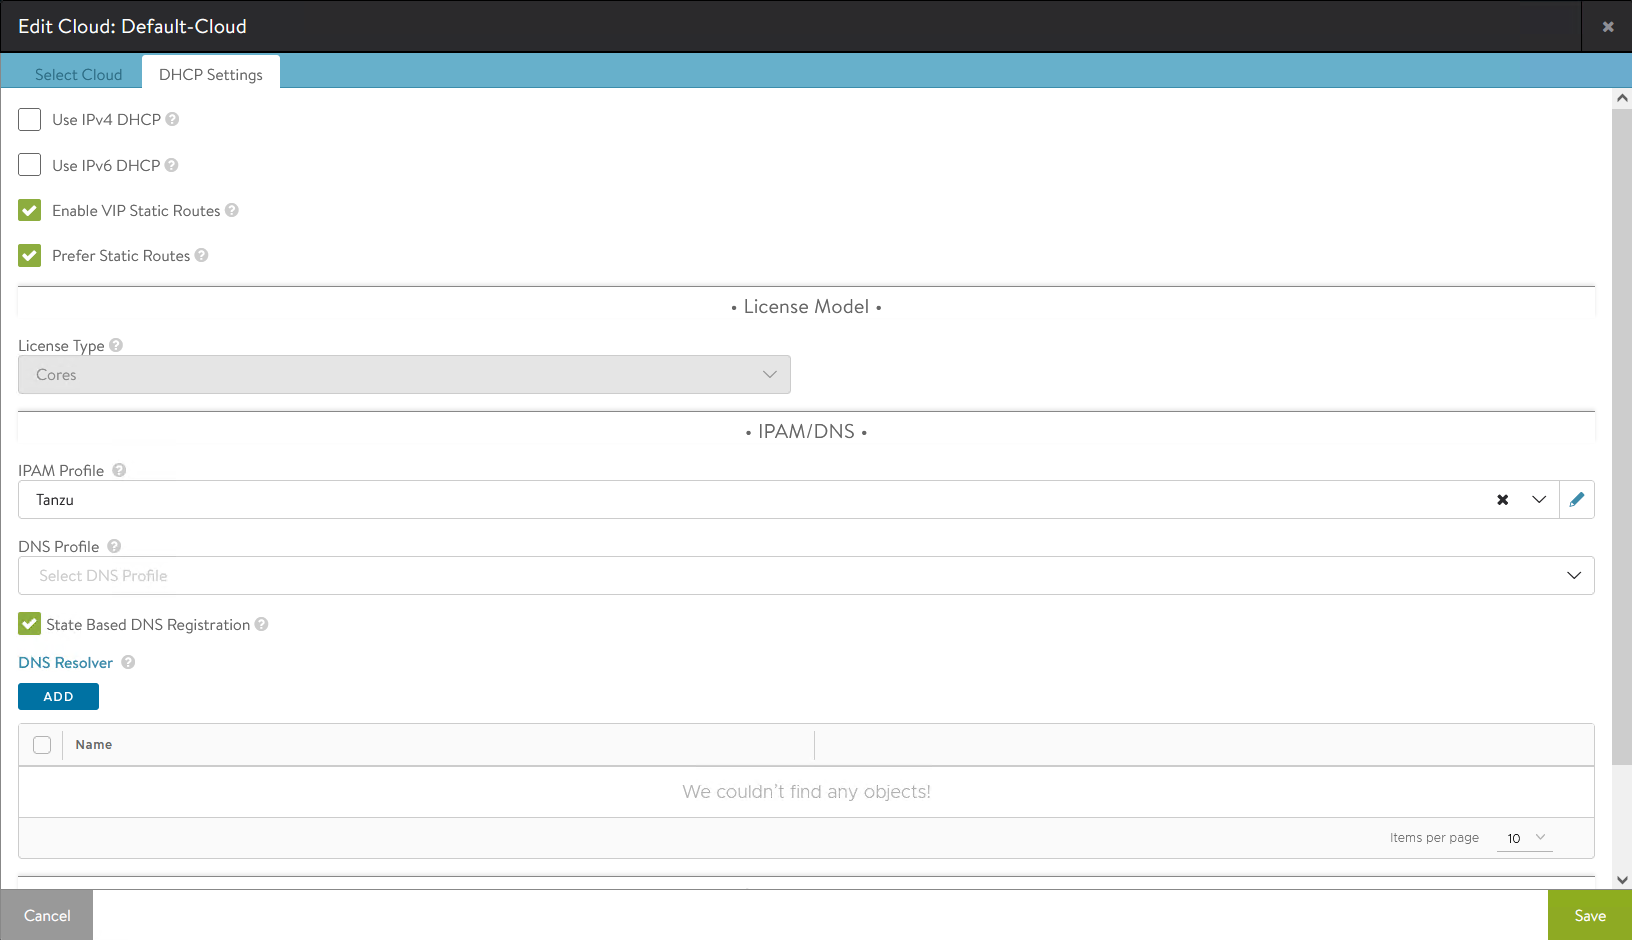
To define our infrastructure we use the avi_cloud resource. With this resource you can define new clouds or edit the existing "Default-Cloud", which is what I did in the example below:
resource "avi_cloud" "vmc_sddc" {
  name = local.cloud_name
  vtype = "CLOUD_NONE"
  enable_vip_static_routes = true
  vmc_deployment = true
  prefer_static_routes = true
  tenant_ref = local.tenant_ref
  se_group_template_ref = local.service_engine_group
  ipam_provider_ref = avi_ipamdnsproviderprofile.ipam-provider.id
  depends_on = [avi_ipamdnsproviderprofile.ipam-provider]
}
On the UI, it will look like this:
Service Engines

- IP Address of the AVI controller (statically assigned in the previous phase)
- Authentication token
- Controller Cluster UUID
- Management Interface IP address (main SE IP address)
- Management Interface IP address
- Management Interface Subnet Mask
- Default gateway
- DNS Information

Deploying a load balanced TCE cluster
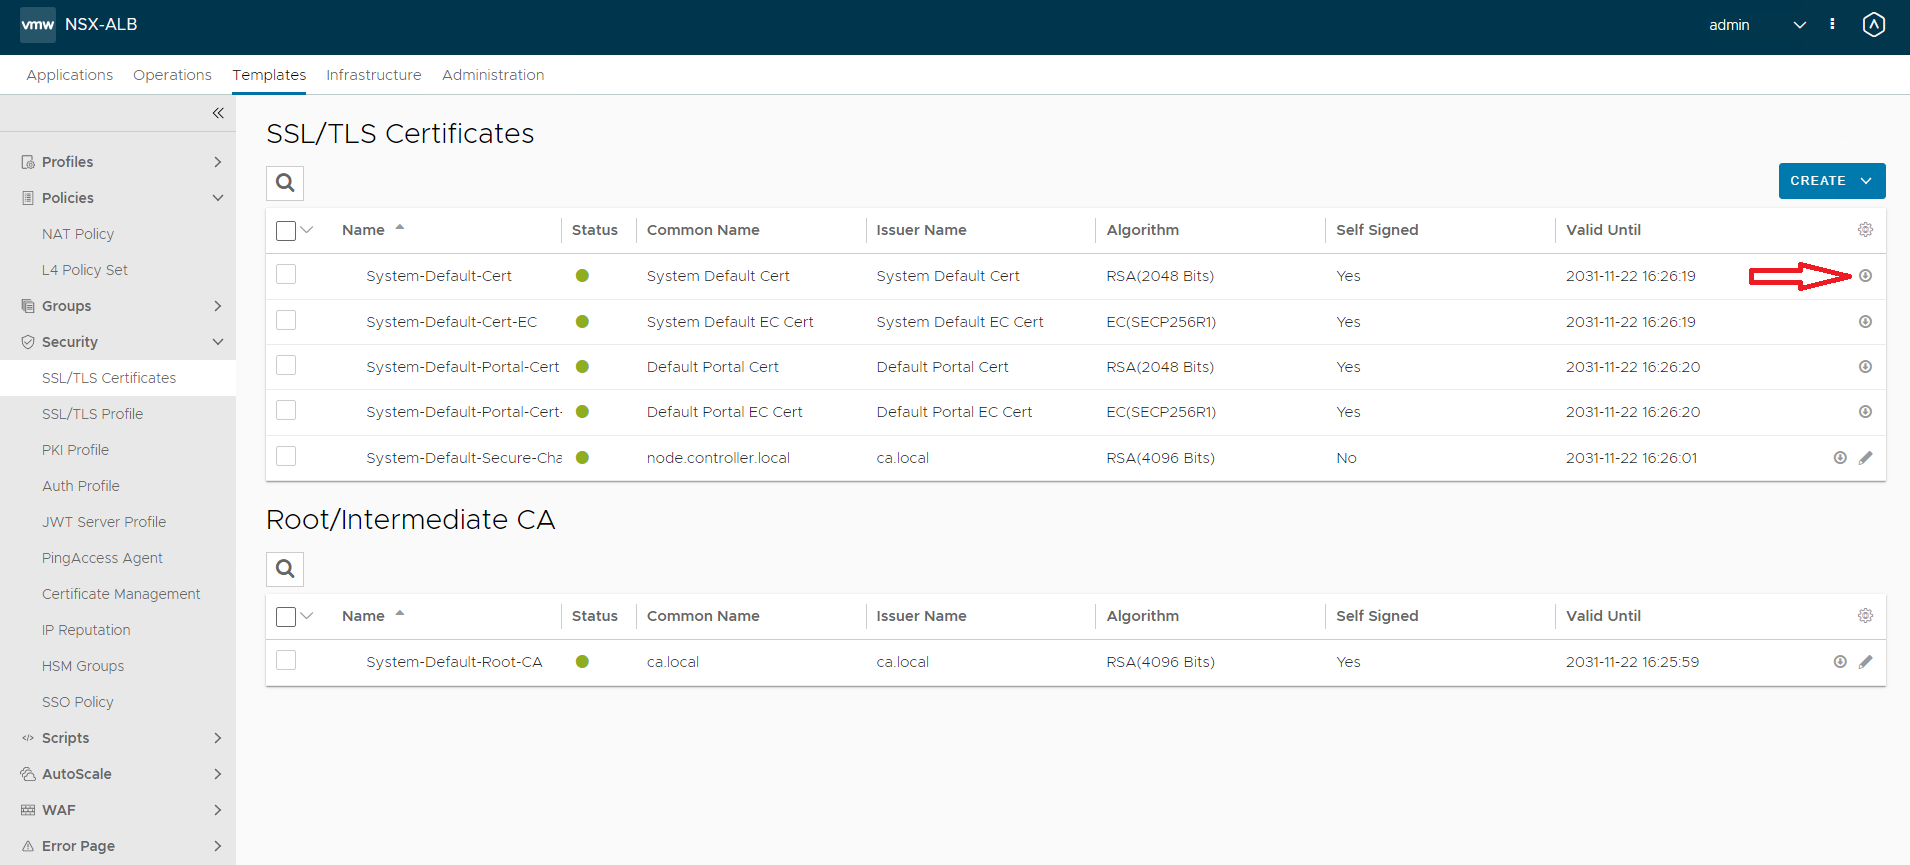
Alternatively, you can use terraform to extract the certificate as a data object:
data "avi_sslkeyandcertificate" "default-ssl" {
  name = "System-Default-Cert"
}

output "avi_default_system_certificate" {
  value = data.avi_sslkeyandcertificate.default-ssl
}
-----BEGIN CERTIFICATE-----
xxxxxxxxxxxxxxxxx
-----END CERTIFICATE-----AVI_ENABLE: "true"
AVI_CLOUD_NAME: "Default-Cloud"
AVI_CONTROLLER: "10.22.3.5"
AVI_DATA_NETWORK: "aviVIP"
AVI_DATA_NETWORK_CIDR: "10.22.5.0/24"
AVI_PASSWORD: "mypassword123"
AVI_USERNAME: "admin"
AVI_SERVICE_ENGINE_GROUP: "Default-Group"
AVI_CA_DATA_B64: "LS0tLS1CRUdJTiBDRVJUSUZJQ0FURS0tLS0tCnh4eHh4eHh4eHh4eHh4eHh4Ci0tLS0tRU5EIENFUlRJRklDQVRFLS0tLS0="When deploying the clusters, we might sometimes see that the load-balancer-and-ingress-service fails to reconcile. After digging deeper into this issue, I found out that this happens because the ako-0 pod is looking for a secret named “avi-secret” which contains the AVI administrator log-in credentials, and which did not get created. If you run into this issue, you can create a secret with the following content:
apiVersion: v1
kind: Secret
metadata:
  name: avi-secret
  namespace: avi-system
type: kubernetes.io/basic-auth
stringData:
  username: admin
  password: mypassword123