Automated Tanzu Community Edition deployment on VMware Cloud on AWS
Join me on deploying Tanzu Community Edition on VMware Cloud on AWS with Terraform and powerCLI!
These first months as IT/cloud consultant at ITQ Consultancy I have been familiarizing myself with VMware Tanzu, as someone who is entering the world of Kubernetes and cloud automation in VMware’s context would do. Tanzu, for those who don’t know, is a suite of products used to manage and run multiple Kubernetes clusters in on-premises, hybrid and multi-cloud environments. Within the whole Tanzu suite, I obviously started with Tanzu Kubernetes Grid, which I deployed on a sandbox environment in VMware Cloud on AWS (to which I will refer to as VMC from now on). Coming from higher up the stack (closer to the application), I have been trying to bridge my knowledge gap between the functioning of cloud-native technologies and some computing, networking and storage concepts I have never really had to deal with; and this project has helped me achieve just that. Shoutout to my colleague Ariel Cabral, who also helped me immensly.
After being provided with the VMC sandbox environment, we were asked to delete our Software Defined Data Center (SDDC) when not in use. Even though that added an unpredicted constraint to the picture, it also encouraged the automation of the deployment of both the SDDC and the TKG clusters.
The automation of this process is not something new, in fact, Gilles Chekroun (Solution Architect at VMware) has already done an excellent job at doing this in his project: TKG, from zero to hero. Even though I could have just used this script, I wanted to build my own (and focus on the learning process), in this case providing all VM configurations and files via Terraform instead of Ansible. This was so because I had just started learning Terraform, and I did not want to add Ansible to the picture (yet). Nevertheless, after the recent anouncement and release of Tanzu Community Edition (TCE), I saw a great opportunity to adapt my script to deploy TCE instead and share my experiences.
The script in a nutshell
The script contains four automated phases and a semi-automated one, which alternate the creation of Terraform resources with the extraction of parameters and manipulation of objects via powerCLI scripts.
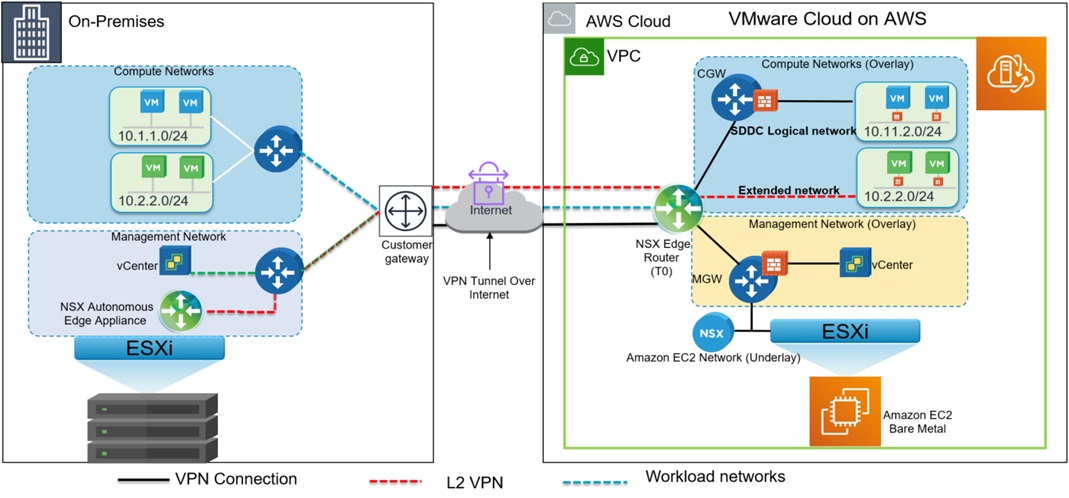
To begin with, an SDDC gets deployed on VMware Cloud on AWS. After its creation, some NSX-T resources are created and network policies are applied, which will allow inbound connections from our on-premises vSphere environment. Subsequently, two OVA files will be uploaded (directly to one of the ESXi hosts), which will serve as the base images for our TCE cluster. After uploading the OVA files, and converting one of them into a template, the vCenter will be queried to deploy VMs in two stages. At first, a jumpbox will be deployed and configured from my on-premises workstation, whose IP has been translated with a NAT rule. The next deployment will consist of the creation of the TCE clusters, which will be executed from the previously deployed jumpbox. Given that the jumpbox’s IP address will also be translated by a VMC’s default NAT rule, it was necessary to allow incoming traffic from the compute gateway’s source NAT IP into vCenter.
Unfortunately, there were a few operations that couldn’t be done with the VMware Cloud on AWS provider for Terraform. To overcome those limitations, some powerCLI scripts were written in order to retrieve certain parameters, such as vSAN datastore’s path and the IP addresses of both the compute gateway’s source NAT and one of the ESXi hosts. The powerCLI modules for VMC and VMC.NSX-T were used.
Without further due, let’s go through each phase of the deployment. For the full script and instructions on how to deploy, navigate to the Github repo.
Phase 1: SDDC Deployment on VMC
The phase 1 is relatively simple: it deploys an SDDC on VMware cloud on AWS, as well as the necessary networking components on the side of AWS, which in this case are a VPC, subnets and a default security group. In order to create the AWS networking resources, it is necessary to importing data such as the VMC connected account, the aws availability zone and route tables.
In addition to the deployment of the SDDC and the networking resources on AWS, a powerCLI script gets executed as a Terraform local_exec process in order to query the vCenter for the compute gateway’s source NAT IP, which will be needed in further stages. Additionally, the powerCLI script will prompt the three IP address that we will be using for our VPN tunnel. The three addresses are: The VPN’s public IP, the infrastructure subnet and the segment where the TCE clusters will be deployed.
Phase 2: NSX-T configuration and VPN tunnel
The phase 2 contains the creation of NSX-T objects and their configuration. Since the OVA file will be uploaded from an on-premises workstation, it is necessary to ensure its connectivity with the VMC environment. For that we will be creating a VPN tunnel, and applying the necessary network policies in both the compute gateway and the management gateway in VMC.

Management Gateway Policies:
The gateway policies applied on the management gateway ensure the connectivity between my on-premises workstation with vCenter, the ESXi hosts, and the default-vm network where the jumpbox will be deployed. The following network policies are applied:
-
- ESXi
- Allow inbound connections from the on-premises VLAN.
- Allow inbound connections from the TKG management network.
- Allow outbound connectivity towards internet destinations.
- ESXi
- vCenter
- Allow inbound connections from the current workstation.
- Allow inbound connections from the TKG management network.
- Allow inbound connections from the compute gateway’s source NAT IP.
- Allow outbound connectivity towards internet destinations.
Compute Gateway Policies:
A few network policies must also be applied to the compute network. These are:
-
- VPC Interface
- Allow inboud and outbound from any source to any destination on any service.
- VPC Interface
-
- VPN Tunnel Interface
- Drop all traffic to the VTI
- VPN Tunnel Interface
- TKG Management network segment
- Allow inbound connections from the on-premises VLAN.
- Allow outbound connectivity towards internet destinations.
VPN tunnel
As previously mentioned, a VPN tunnel is needed in order to upload the OVA templates into the ESXi hosts. This is the case because the VMC provider can only connect to the local IP address at the moment. Unfortunately, the Terraform VMC provider does not have the necessary functionality to automate the deployment of a policy-based VPN tunnel. In order to overcome this limitation, a PowerCLI script will be the one that will create the VPN.
Phase 3: OVA upload
Once the connectivity between my on-premises workstation and the SDDC on VMC has been ensured, it is time to upload the necessary OVA files into our vSphere environment. Deploying an OVA file into your VMware Cloud environment can be done in diverse ways. One way to do it, would be to create an S3 bucket on AWS which serves as fileserver for the OVA file, for further deployment in vSphere. Alternatively, if you have an on-premises vSphere environment, you can also connect your VMC environment to your local content library.
For this deployment, two OVA files are needed: the focal server cloud image (which the jumpbox will use as base image), and the ubuntu TCE OVA image, previously downloaded from the VMware website.
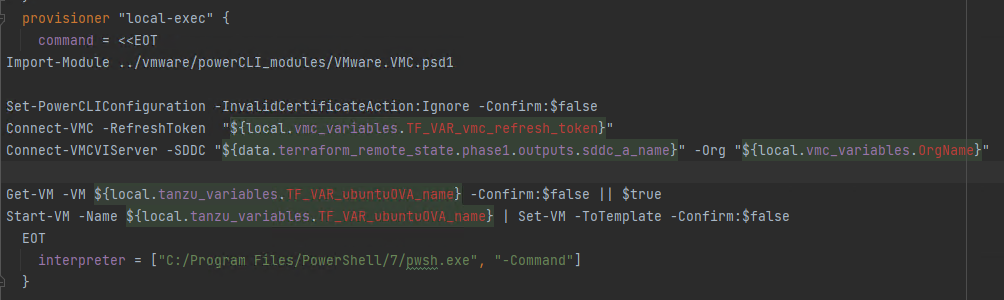
After the TCE OVA file has been uploaded to vSphere, it is converted into a template by a powerCLI scripts that looks like this (variables in red are a consequence of the Terraform plugin I installed on SDE):
Troubleshooting
If you were to get an error thrown which says that your virtual machine does not have a network defined, you must check what the predefined network on that OVA file is. You can do that with VMware’s ovftool
ovftool <"YOUR_OVA_FILE_NAME"> This command will prompt some of the OVA file’s metadata. In this case we are interested in the network name, so after running the command we will check the following field:

If the network name differs from “nic0” like in the example image above, please fill in your value in vsphere_virtual_machine.ubuntuOVA.ovf_deploy.ovf_network_map as such:

Phase 4: Jumpbox deployment and bootstrapping
This phase deploys and configures a jumpbox VM by using the focal server cloud image, as well as provisioning it with the necessary configuration files to further deploy TCE.
While I was writting the script for this phase, I ran into the tkg-terraforming-vsphere project, by Alexandre Roman (Solution Architect at VMware), which did exactly what I needed (in a more elegant fashion than what I was building). I was very impressed when I found it and even more when I actually started to grasp the way his script worked, which in turn helped me expand my Terraform knowledge. This script was then integrated into my code by allowing it to inherit variables from the previous phases.
Additionally, this phase requires the URL of the vSAN datastore where our workloads will be deployed. This parameter was previously extracted via one of the powerCLI scripts.
Phase 5: Deployment of the Tanzu Community Edition clusters
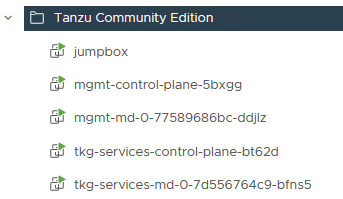
Once the jumpbox VM is deployed and bootstrapped, it is time to deploy the TCE clusters. The config file needed for this deployment was filled in and provisioned to the VM in the previous phase. In my case I deployed two two-noded clusters, one for the management control plane and another one which will serve as shared services cluster (where some of the Tanzu packages will run).
Phase 6: Deployment of the TCE packages
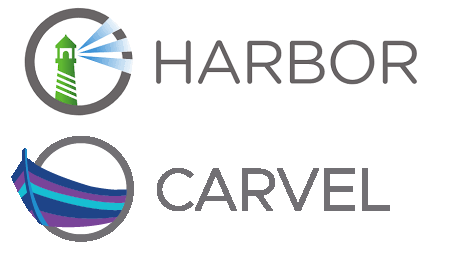
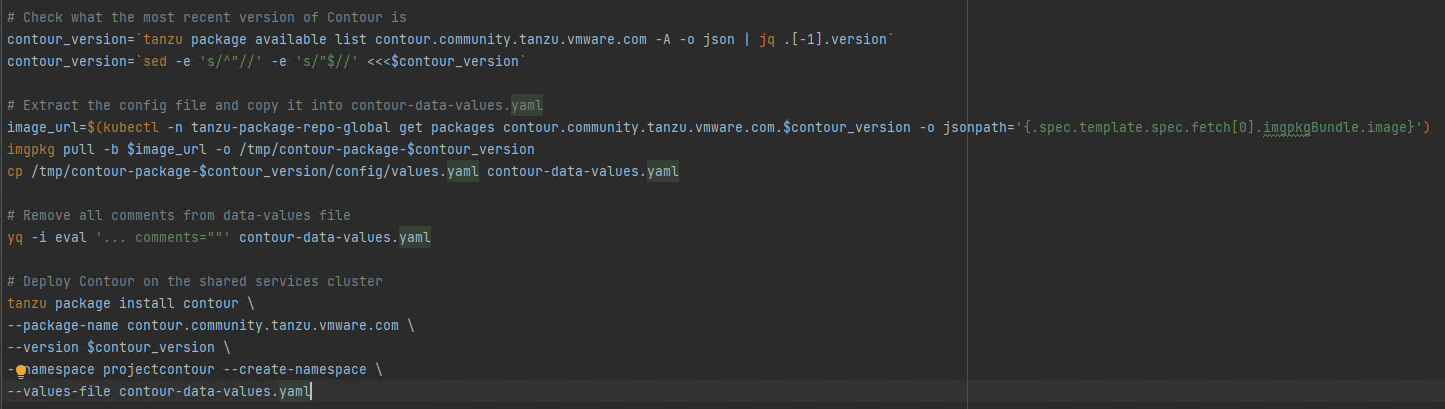
After deploying the shared services cluster, it is possible to install some of the Tanzu packages on it. In this case, we deployed cert-manager, contour, harbor, prometheus and grafana. In order to automate this process, I created a script with (by using some of the carvel tools) that checks what the latest version from each package is, downloads a config file (for possible customizations) and it applies it:
As a final note I would like to add that I am by no means a Terraform expert, so if you review the script and think that some processes could be implemented in a more elegant way, please drop a comment so that we can discuss it!
EDIT: Here’s a video we recorded about this blogpost